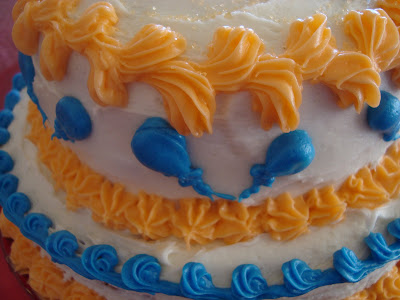
Taylor is a tough customer. He wanted an ice cream cake. Not just a cake with a layer of ice cream in it, which I've done before. Nope. He wanted an all ice-cream cake because he doesn't like cake.
Well, it took a while. But I finally got it done. Basically, I bought a tub of chocolate ice cream, and one of strawberry revel, which is his favorite. But because I wanted the cake to be soft, and not hard...I couldn't just cut the ice cream out of the tub and put it on the platter. So, I got out my kitchenaid, and mixed it up until it was at soft-serve state. I had to make this cake layer by layer. Just adding soft-serve ice cream to the platter, quickly shape it and then put it into the freezer. This took all day to slowly get the cake to be the right shape. Then for the frosting. I wanted to use strawberry revel, but by mixing that up it would make it PINK...not very boyish...so I had to add some food coloring to it. I came up with yellow, because I wasn't sure what green and pink would turn into. So, although this cake isn't as beautiful as some of the others I've made, it was very very tasty for a summer birthday! I finished off the borders with whipped topping and added sprinkles.
Sunday, August 29, 2010
Placemat Handbags
Something that I learned how to make a few years ago, and which I've really enjoyed making ever since is placemat handbags. They are a really fun project for beginners, and make for some really fun gifts. You can make them into themes, for example a "Spa bag" filled with lotions, bath salts, facial masks, etc., or a "keep in touch" bag with stationary, pens, markers, stickers, envelopes...the possibilities go on and on. They are really fun.
You start out by watching the sales in local department and discount stores like WalMart, Target, Kohls, etc....and by them when they're cheap! As I'm typing right now, I have a stack of them in my craft room just ready to be made. I also watch for sales on ribbon and silk flowers...because that's what I like to use to make them cute.
So, you lay out your placemat, and decide if you're going to add anything to the front as embellishment, and add it on before you start any sewing. Then, you fold it in half so that the outside fabric is turned to the inside. Sew along each side edge, leaving the top open.
Sometimes, I sew the ribbon handles on before I sew the side seams, it just depends on what style I'm going to do. Once you have the side seams finished, you lay them out so that the bottom corner lies flat and sew straight across the bottom. This makes it so that the bag will have a definite "bottom," it will sit upright all by itself and you can easily place books, or other items into it. It just gives it a more finished look on the sides.
Yellow Cake with Fudge Frosting
No really, this frosting isn't "sugary" chocolate, it's that really good "cocoa" tasting chocolate that just melts in your mouth. I made this cake for a meeting at our church...the ladies liked it. Hey, it was chocolate, how could you NOT like it?
Valentine's Day Jello Cake
Yum. That's all there is to say about a jello cake! Start with a white cake mix, and bake it according to directions. Let the cake cool a few minutes and then poke it all over with a fork. Mix up your favorite flavor/color of jello, and then pour it over the cake. Don't worry! It WON'T make the cake soggy. Put the cake into the fridge and let it set. Then, just before you're ready to serve it, place cake pan for just a few seconds into a sink of hot water, and then you can put it onto your serving platter. The hot water releases the jello so the cake comes clean out of the pan. I "frost" my jello cakes with cool whip, and then add fun things like flowers, sprinkles, or sugar glitter to make it pretty.
For Valentine's Day this year, I made a white cake with strawberry jello. For a little added fun, the filling is cool whip mixed with sliced fresh strawberries. Yummmm....so good. I used one of my Valentine's Day roses to make it beautiful and tada! Cake!
Lainah's 1st Birthday Cake
Here is a picture of Lainah's 1st Birthday Cake.
Lainah's personal cake is the one with the candle on it...the other one is for her guests to eat.
She demolished it...it didn't stay pretty for long! On these cakes I used silk flowers, but I prefer real ones for the nice scent they add. A little lace along the bottom of the cake is an easy way to dress up a cake border too...we're all about easy here!
Rachel's Baptism Dress
I decided even before we were blessed with our first baby girl, that I wanted to make their blessing dresses and their baptism dresses. These are such significant events in their lives, I wanted to make it a little more special by making them something with my own hands, rather than going and buying something from the store. So, although I'm sure I could have found dresses that were more elaborately and more professionally made, I hope that my girls will look at their dresses and know that their mother made them with her own hands out of her great love for them.
For Rachey's dress, I wanted to make it "girly cute," meaning that I wanted it fancy and a little more formal than a regular church dress, but I also didn't want it to look like a little white prom dress. I still wanted to capture her cute little 8 year old personality and let her stay a little girl. So that was my objective with this one, make it beautiful, and white, and special, but keep it simple and little-girly cute.
On the bodice, I added little ribbon embellishments and flowers to dress up the simple design. The fabric I chose, was a nice simple white that has a little sheen to it, but not a lot. The fabric is machine washable, which I had to look very hard to find, but I wanted her to be able to wear it to church afterwards, and not just on her baptism day!
I dressed up the waistband by adding two rows of ribbon, and a satin rose which is simply pinned on so that it can be taken off when laundering. Here she is wearing her baptism necklace and beaming on her special day.
The back was just a simple ribbon bow. To add to the fullness of the skirt, I added two layers of gathered tulle. Then, to dress up the skirt a little, and to add that playfulness of a little girl, I added a slightly gathered ruffle. She loved it...that night she spinned around and around to watch the full skirt ruffle around her. Too cute. Here she is trying it on for the first time! She was so excited, because it was the night before, and she had no idea that I had made it. I did all my sewing in the middle of the night in order to surprise her. It was worth all of those hours of lost sleep.
Rachel's Baptism Jewelry
December 2009 brought Rachel's 8th birthday which meant baptism time! I wanted to make her something special to wear and to help her remember her special day, so I made her a matching necklace and bracelet set.
Because baptism symbolizes a washing and making clean and perfect, I wanted her jewelry to also reflect purity, and so I chose to use clear glass beads and pearls to reflect that.
I started with jewelry wire so that it would be strong and be able to withstand 8 year old treatment. And then I just played around with different patterns until I found the one I liked the best, and thought Rachey would like the best.
I also made a center dangle for the necklace, as well as a clasp dangle for the necklace and bracelet. It just made it a little extra fancy, and I knew that Rachel would like that. The top is the finished dangle, and at the bottom of the picture shows the materials I used to make it.
This isn't a great picture, but here are the finished products! They looked beautiful with her white baptism dress.
Lainah's Blessing Dress--A Personal Masterpiece
I have so much to learn when it comes to sewing. Sometimes, I get so frustrated because what I envision and what actually gets made are usually two different things. My knowledge and skills don't match up to my expectations I suppose. But, this time, with Lainah's blessing dress, it all just sort of clicked. It isn't perfect, but I think it's as close as I've ever come to designing something beautiful in my mind and then making it come to life in my hands.
Lainah is our third daughter, and each of their blessing dresses have been different. Different patterns, different fabrics, and just different designs. With each, I tried to make something that I felt would reflect a little bit of their sweet, fresh from heaven personality. With Lainah's I really wanted something to show how special our 5th baby was to us. I wanted her to know that mommy spent just as much time and effort on her dress as I did the first. I wanted it to be intricate, but also delicate.
I couldn't possibly go through the directions here on the blog, it was too complicated, but basically, I found a dress pattern that fit as closely to what I had envisioned in my mind as possible and that's where I started. Then I had to add layers, or improvise in order to stick to my own design for her.
These little flowers and ribbon made the front so cute, and they also went really well with the skirt fabric, which was an organza with flower embroidery. So beautiful.
On the back, I put the little white satin buttons, and brought the ribbon around her waist to tie in the back, leaving long ribbon tails going down the length of the dress. I also kept the sleeves unlined, so that you could see her cute little baby arms underneath. I didn't want the dress to overpower the baby, I wanted it to be delicate like she was. Here is the back view of the dress. I added a strip of ribbon around the bottom of the skirt to match the ribbon on her waistband. And the front view. And here is our beautiful little girl modeling the dress herself. So perfect.
Labels:
baby,
children's clothing,
ribbon embellishments,
sewing
Baby Blessing Headband
For Lainah's baby blessing, I wanted to make her a little headband that matched the dress I was making her, but couldn't find one in the stores. They were all made of satins, or just too glitzy for what I wanted, so I had to make one!
I started with a little pair of white tights. The soft nylon doesn't scratch baby's head, and it automatically rolls on the edges so you don't have to worry about edging it at all, it's wonderful. Then I just found some silk flowers that were simple and small so that they wouldn't overpower my little one's cute newborn head. With silk flowers, you just pull the middle stem out of them so that you get the loose petals, and then you can rebuild them into whatever color scheme you choose. This way they also lay flat when you glue them back together and then you can attach them to whatever you want: magnets, barrettes, clips, headbands, bobby pins, etc. It's great. You simply glue them back together with a hot glue gun. Very simple.
Here is the finished headband.
While I was at it, I made a little flower clip for my bigger girls. This project took maybe 30 minutes total, it was so fast, and very fun!
Privacy Nursing Blanket
How many of us nursing mothers have ever tried to use a blanket to cover ourselves and the baby while trying to nurse! My biggest frustrations were always that the baby would wiggle, and I would always be adjusting the blanket to keep it in place, or that the poor little one would be too hot under there with no ventilation, or simply that I couldn't see my baby when I needed to.
I have a great friend who showed me a nursing blanket that she had been given as a gift. It was a fabulous idea, with a little boning in it to create a nice curve, with a little strap that goes around mom's neck and then snaps into place and wa-lah! A nursing blanket that provides privacy, but that also allows mommy and baby to be in comfort. And the best part, it only takes 1 yard of fabric.
So, I actually had this fabric scrap in my sewing room so this is what I used rather than going and buying more fabric. I believe that I started with about 1 1/4 yards. I trimmed the fabric so that it was a nice even rectangle.
The fabric that I cut off in order to make the actual blanket the dimensions I wanted I set aside to be made into the strap and also a burp cloth.
After I had the fabric trimmed, I hemmed it around three sides with a simple fold-over straight-stitched hem. I left the top side of the blanket untouched.After hemming the sides, I folded the top over and marked with pins where I wanted the boning to set. As you can see from the picture, it only took a small piece, just enough to create a little curve in the blanket. After marking with pins, I made a straight-stitch hem, securing the boning in as I went. Then to be sure the boning wouldn't slip, I went back and made just some small stitches on either end of the boning.I had some fabric left over, so I made this little burp cloth to match the blanket. I just made two rectangles the same size, and stitched them together, leaving one end open for turning. Finish stitched the end after turning, and then added some ribbon to embellish it a little bit. From this picture, you can see how the blanket will just naturally create a little "window" for mom and babe to peek through, while not compromising privacy at all. The strap I really liked, because my babies are wiggly, and I never had to worry about blanket flying off suddenly with a kick or wiggle. I wish I would have discovered these great blankets on the first baby!
Labels:
baby,
blankets,
nursing,
ribbon embellishments,
sewing
Subscribe to:
Posts (Atom)